

It’s no secret that high-quality photos of your products can inspire and motivate your customers to take action.
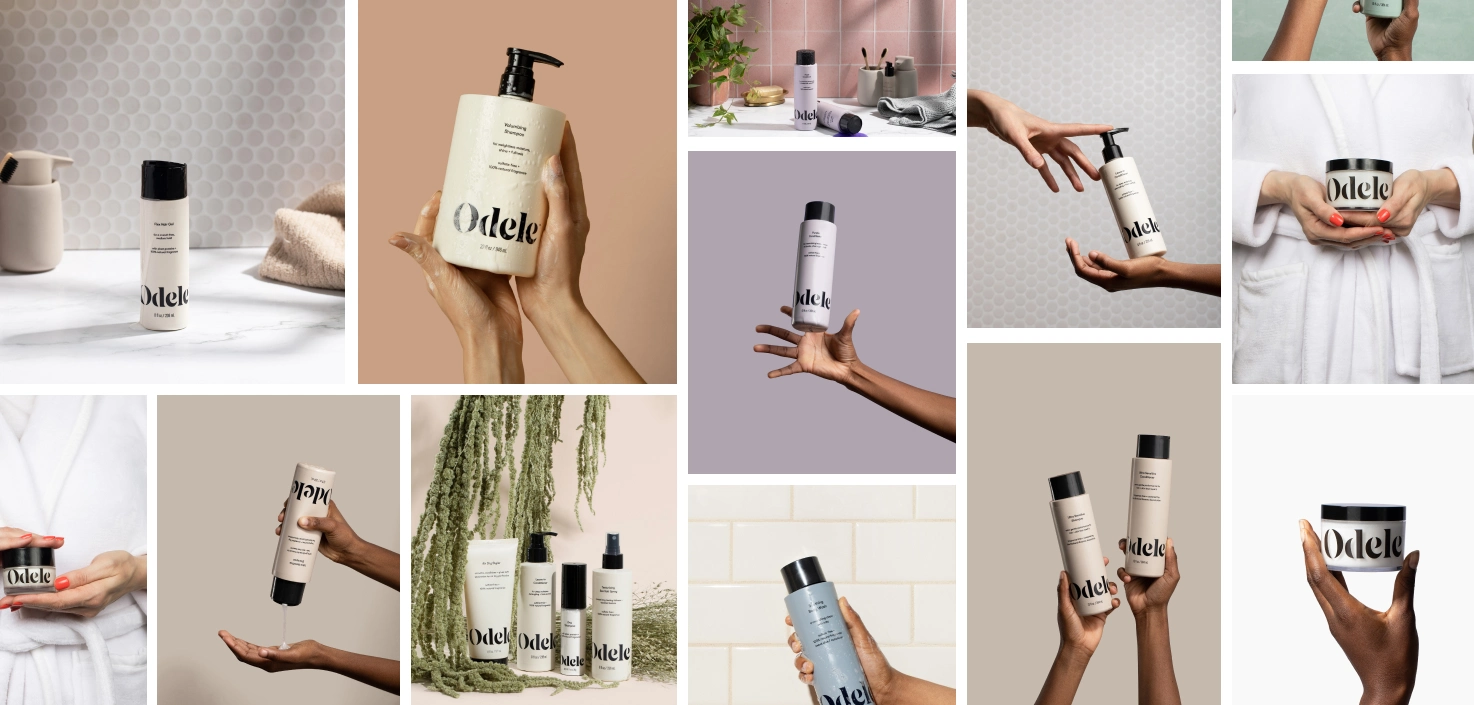
One of the easiest ways to level up your brand aesthetic is by styling your product photos with eye-catching props. Props help bring your photos to life, giving interested online shoppers more reasons to click “add to cart.”
Ready to style your next product photo shoot like a pro? In this article, we’ll share our top tips on how to use props effectively and our favorite prop ideas for your next photoshoot.
Why props are important in product photography
People interact with thousands of photos and videos every day. If you want to grab people’s attention and get them to stop scrolling, you’ll need something to help you stand out. A professional, styled photo shoot can help you do just that.

A styled photo shoot is a photo shoot that combines visual elements with composition strategies to tell a captivating story about a product or brand. Photo styling helps convey emotion—inspiring viewers to feel what it’s like to be a part of your brand's story. It can also help highlight key features or functions of a product, so your customers understand how it works in real life.
Styling encompasses many different elements, including props, lighting, backdrop choice, and photo composition. With the help of photography pros, you can use photo styling to effortlessly communicate your brand values and attract the ideal customers to your business.
Six best props to use when styling product photos
From geometric risers to eye-catching backdrops, there are thousands of great prop ideas that can take your product photography to the next level. To help guide your search, we’ve put together a list of our go-to props for your next product photography shoot.
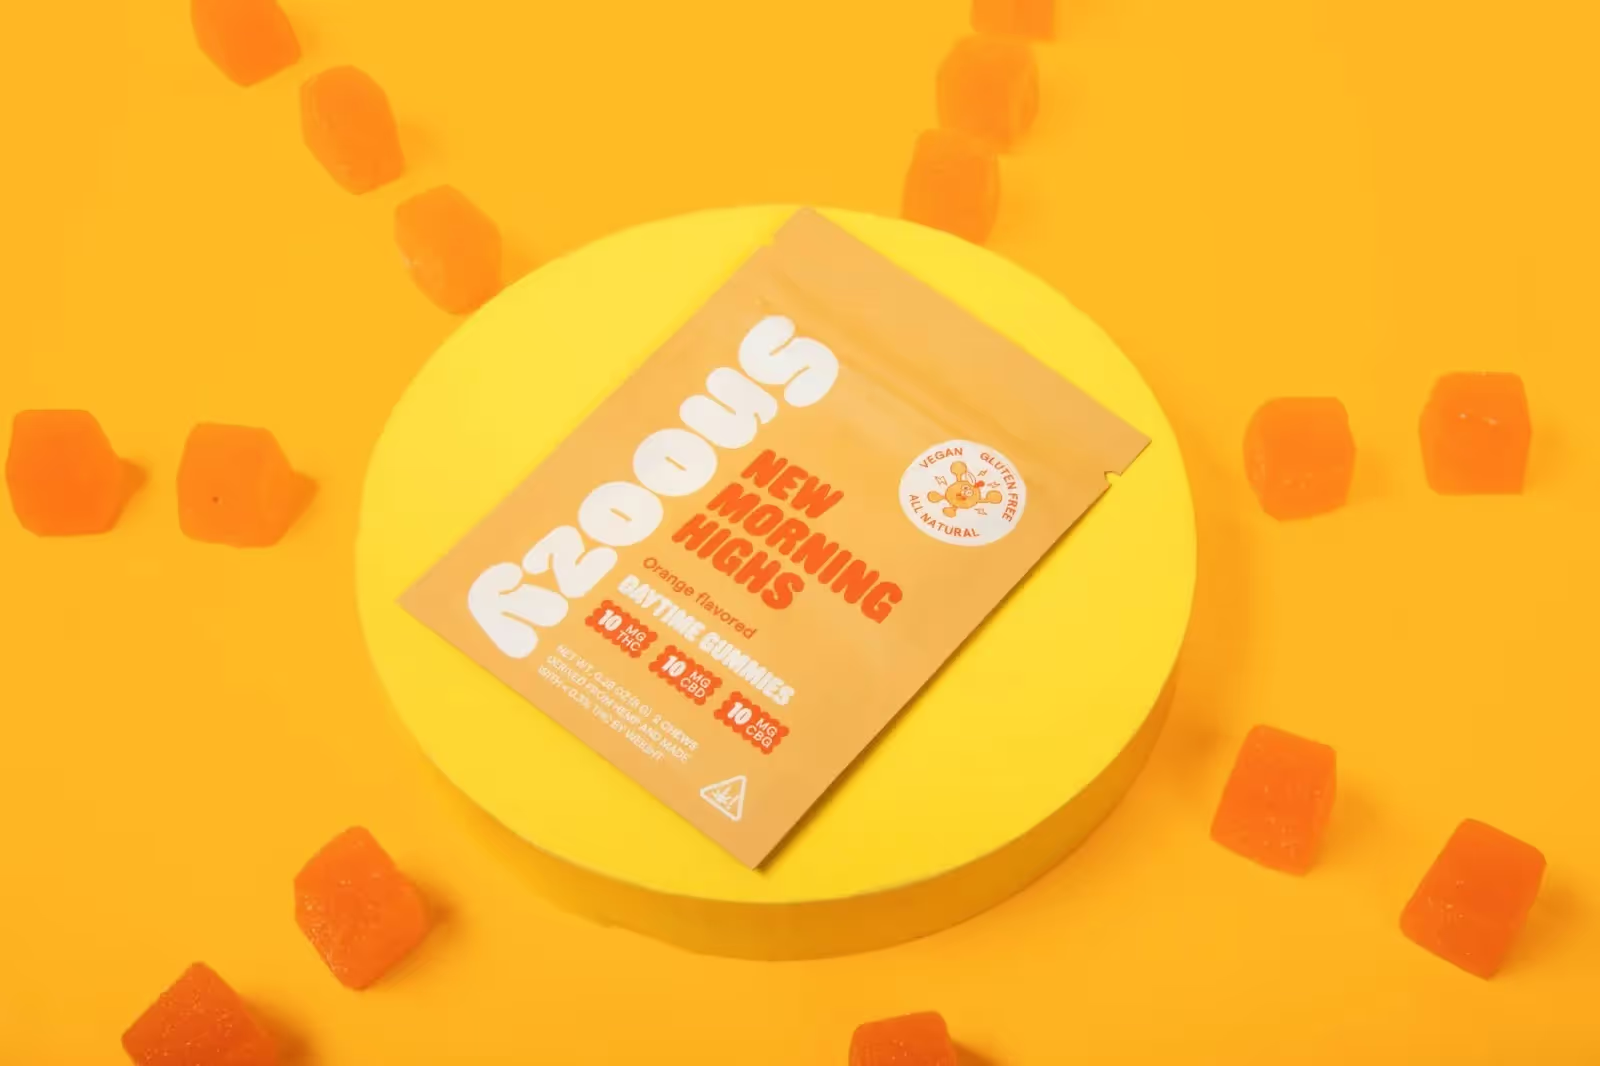
Styling blocks and risers
Geometric risers, or styling blocks, are some of the most popular and versatile props for product photographers. By adding different blocks and shapes to the shot, you can add dimension and visual interest to the photo.

Risers help with layering multiple products or items within an image. Transparent styling blocks are also great for elevating objects and creating sleek, beautiful flat-lay shots.
Fabrics and textiles
Fabrics are an elegant way to add texture and depth to your photos. Photographers frequently use textiles and fabrics to prop up beauty items, accessories, and home goods. We love using fabrics as props because they’re easy to find and effortlessly create an elegant, high-end look. If you’re looking for more variety, you can replace a static backdrop with a flowy, silky fabric.

We recommend using neutral-colored fabrics that align with your color scheme. That way, you can highlight your product and add depth to the photo without distracting the viewer's eye to a busy or bright fabric.
Mirrors
Mirrors are one of the best styling hacks out there. The reflection of a mirror creates a new, creative angle for any product type.

Mirrors are perfect for flat-lay cosmetics and beauty shots. They’re also great for displaying the different angles and dimensions of a jewelry item or accessory. Mirrors are portable, affordable, and statement-worthy—making them a must-have for your prop kit.

Trays
Similar to styling blocks, trays are an excellent prop to use if you want to add depth, layering, and visual interest to your photos. Trays are available in various sizes, shapes, colors, and materials. The most common application for trays is food and beverage photos, but we’ve also seen trays used effectively in skincare and beauty photos.

Natural accents
Botanic accents like flowers and greenery create a soft, fresh look in your photos. You can choose from a wide range of options in this prop category.

Use fresh flowers or a potted plant to infuse vibrance and life into your product photos. Add a few leaves or flower petals to your flat lay to create shadows and add dimension. With natural accents, the possibilities are endless.
AI props
You don’t need actual tangible props to add them to your shots. You can use AI to add whatever props you can think of. The benefit here is you have tons more flexibility, and you can switch out props without having to shoot photos all over again.
<div style="position: relative; padding-bottom: 44.375%; height: 0;"><iframe src="https://www.loom.com/embed/0348468a32584070b4699015889ba269?sid=9659b57b-0f06-412c-888b-bc2abbe9a0ce" frameborder="0" webkitallowfullscreen mozallowfullscreen allowfullscreen style="position: absolute; top: 0; left: 0; width: 100%; height: 100%;"></iframe></div>
Whether you're updating fresh uploads or building upon your existing shoots, AI props allow you to seamlessly infuse new life into your images. Enhanced photos are conveniently saved and displayed in your personal galleries.
Tips for styling your product photos with props
Photo props come in many different shapes and sizes. Before you select props for your next shoot, there are a few things you’ll want to consider:
Know your audience
Before you start buying props online, take a step back and examine your brand message and audience needs. Knowing the exact message your product shots are trying to convey will help guide your prop choices and styling decisions.
Start by looking at your brand guidelines. Is your style simple and clean? Or bold and colorful? What props complement your brand specifics, like your voice, style, and tone?
Next, think about your audience. Are you selling in a high-end market or budget-friendly space? Do you have a target audience in mind, such as a specific demographic or interest group? Understanding your audience and how your product photos can communicate your brand message will save you time and money when selecting props.
Understand your lighting needs
Lighting is one of the most important styling elements in photography. Lighting profoundly affects how the viewer perceives your product. Not only does lighting determine how bright or dark a photo appears, but it also enhances the emotions and finer details of a photo.
One of the most basic and affordable lighting options is natural light. Natural light is any light that comes from the sun or moon. Pros and amateurs alike use natural light throughout the day to capture various light qualities and intensities. For example, photos captured during the “golden hour” (right after sunrise or just before sunset) have a warm, glowing effect.
In contrast, artificial lighting is any light produced from an artificial source. You can create countless lighting scenarios at any hour of the day with artificial light. It is more predictable and manageable than natural light. Whether you’re going for a crisp, clean look or a dark, moody vibe, artificial light can do it all.
Talk to your photographer if you’re unsure about the best lighting for your photos. They’ll be able to give you expert advice and help you pick the perfect lighting to enhance your brand vibe.
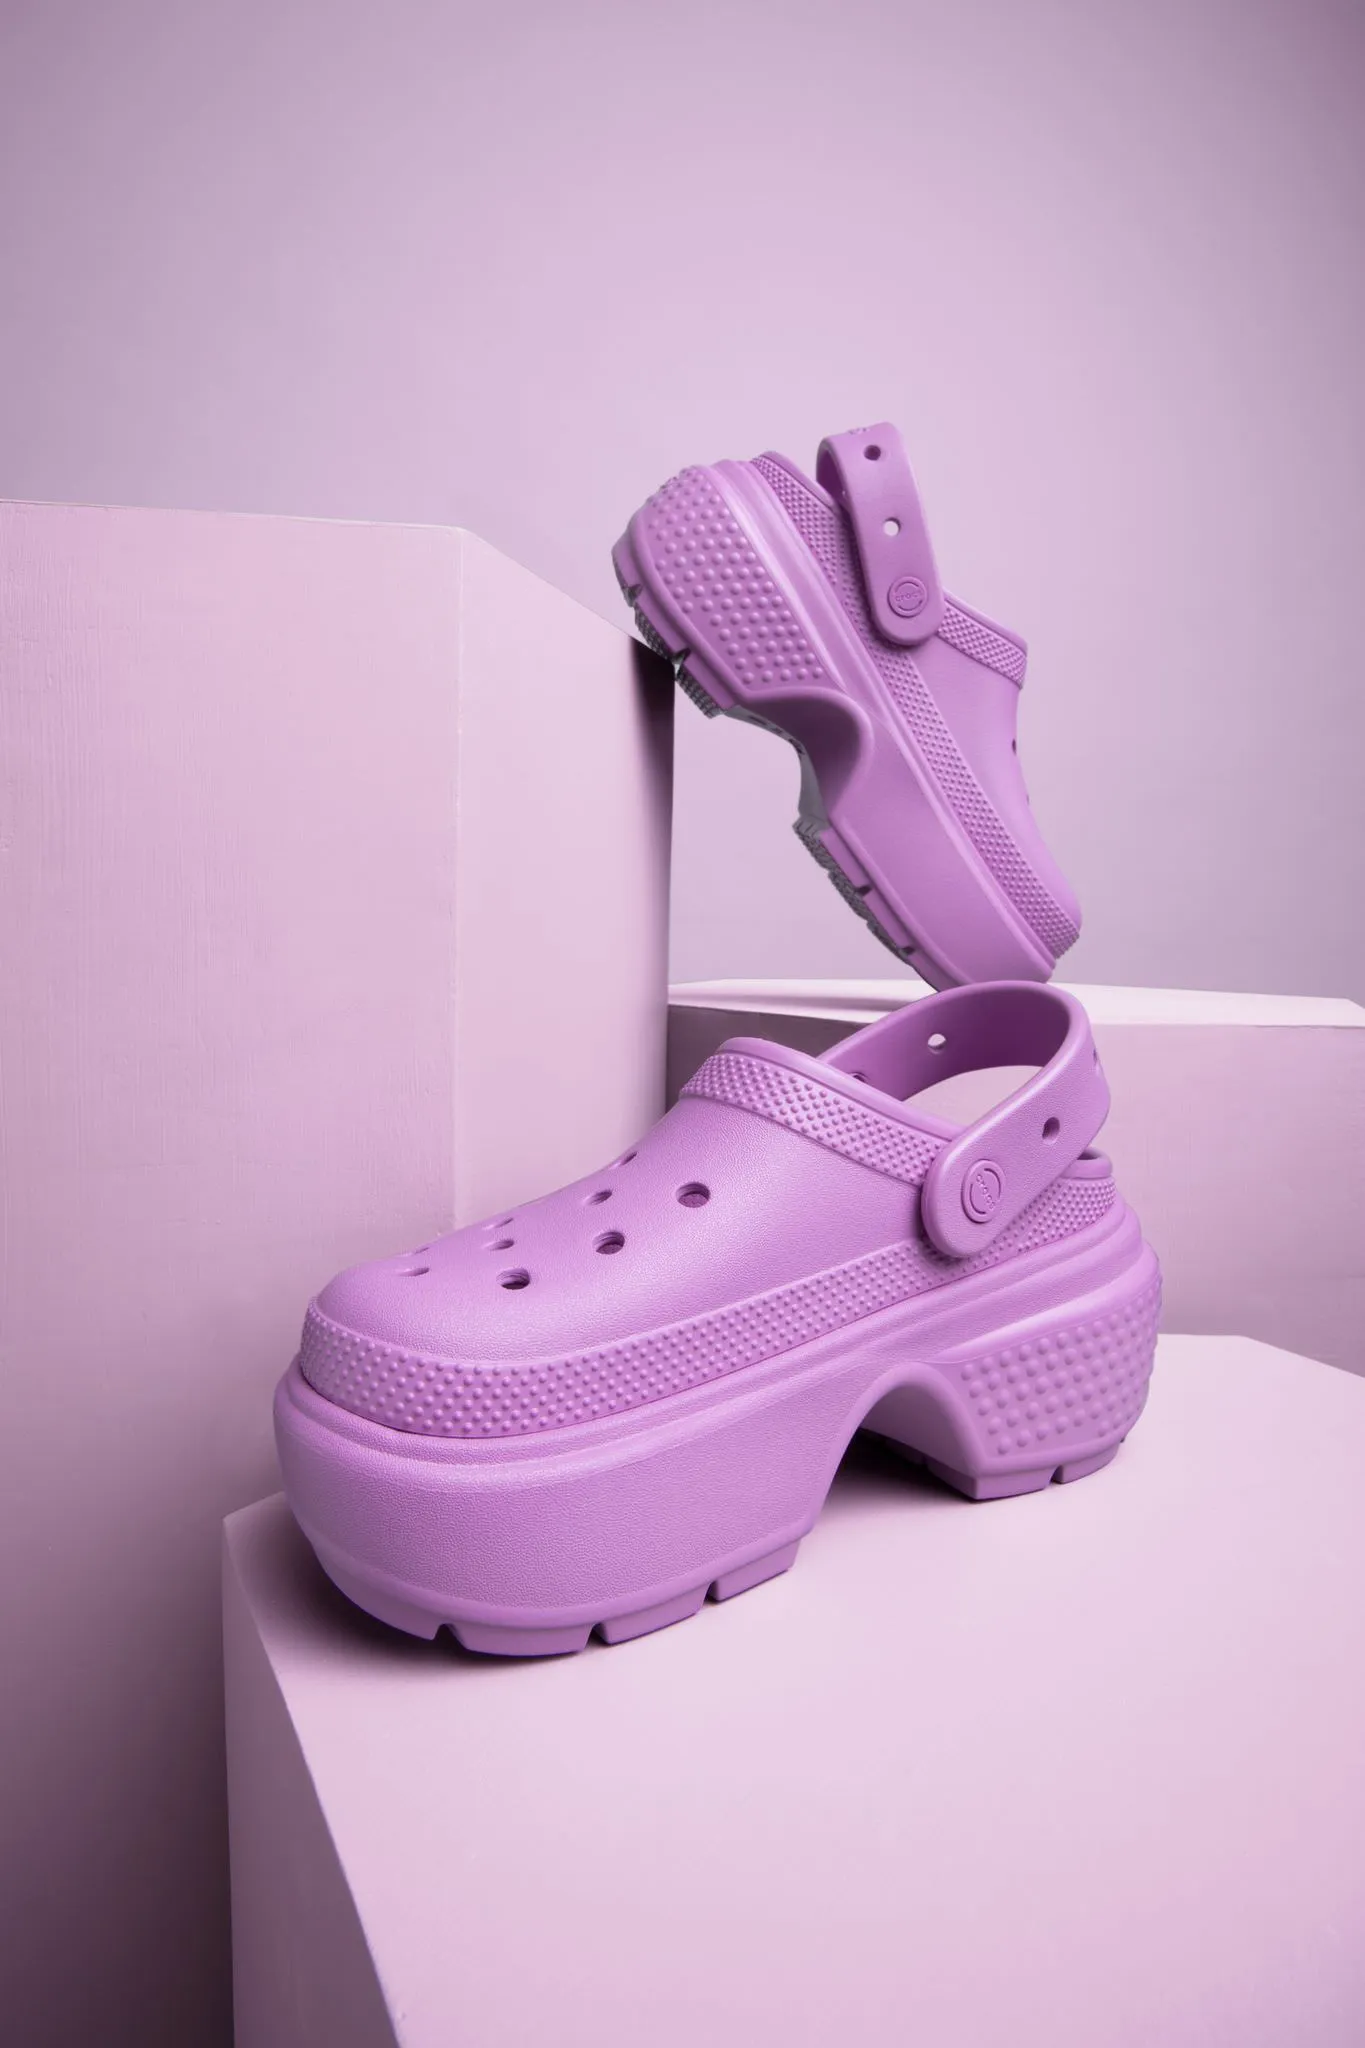
Pick the right backdrop
The perfect backdrop can do wonders for setting the right tone and drawing attention to your product. When choosing a backdrop, follow a few simple guidelines.
- Choose a color scheme that complements your brand aesthetic
- Pick subtle, neutral colors that draw attention to the product
- Experiment with different textures like wood or metal
- When in doubt, use a neutral like cream, white, or dove gray
The right backdrop choice will not only enhance your brand look—it will also isolate and draw attention to the product and complementary props in the shot. As you build your shot list, try various backdrop colors and textures to see which one resonates most with your audience.
Think about photo composition
Once you’ve figured out the best lighting and backdrop choice for your photos, it’s time to pull everything together. Before you arrive at your shoot, think about how you want to arrange your props and products within each shot.
Photo composition refers to organizing items in a photo to draw attention to the main subject. When composing your product shots, you’ll want to ensure your product is front and center.
One way to achieve this is by using the rule of thirds. The rule of thirds is a photography guideline that places the subject in the left or right third of the image, leaving the other two-thirds open. You can use this technique to create more balanced shots and draw the viewer's eye to the main focal point of your photo - your stunning product.
As you start arranging your photo layouts, select props that enhance the overall composition of the shot. Stick to the rule of thirds, so you don’t overcrowd the shot or distract from the story you’re trying to tell.
Choose the right size and quantity
The size and quantity of props you use play a critical role in the impact your photos have on your audience. Too many props can overcrowd the shot and confuse viewers. Props that are too large can mislead people into thinking your product is smaller or larger than it appears.
In photography, scale is a technique used to measure the size of one object relative to another. This technique is often used in product photography to give viewers a better idea of the actual size of a product. When choosing your props, select small items that add dimension and visual context to the photo without dwarfing your product.
The quantity of props you choose is just as important as the size. Some products require several props, while others only need one. For example, if you’re shooting a beauty kit, you might use several geometric risers to layer the shot and add dimension. Whereas, if you’re shooting a food or beverage item, you may opt to use a single prop like a spoon or a cup to draw attention straight to the product.
Before you choose props, think about your shot list and calculate how many props you will need. If you decide to use more than one prop, make sure it blends cohesively with your color scheme and fits the overall theme of the shoot.
Keep your budget in mind
You don’t want to break the bank buying a whole set of props you may or may not use. Take a minute to jot down your dream prop list and put them in order of priority. That way, you can focus your budget on must-have props vs. your prop wish list.

When finding your props, the best place to start is right inside your home. Look around your space for everyday items you can efficiently use in your next shoot. You can also check out your local second-hand shops or vintage stores for unique styling items. If you are looking for something ultra-specific, search online and purchase your prop from a shop that specializes in photography props.
Create product content that converts with soona
Bold, eye-catching product photos are a must-have for your online store. That said, getting quality content at an affordable price is not always an easy task.
That’s why we’ve designed our virtual platform to make it easy for you to get the content you need on any budget. The soona platform makes exploring new looks and experimenting with different props simple and fun. You’ll find everything you need to get inspired, build your next shoot, and wow your audience with professional photos of your products.
{{studio-ad}}
Product photography props FAQs
What are props in product photography?
Props in product photography are objects or items used to add visual context and enhance the overall emotional effect of a photo.
What are some good photography props?
- Styling blocks and risers
- Fabrics and textiles
- Mirrors
- Trays
- Natural elements
- AI props
What are natural props for product photography?
- Plants and flowers
- Wooden items
- Fabrics like linen, cotton, or burlap
- Stones
- Shells
- Water
- Food
How to use props in a photo?
- Complement the product: Choose props that enhance and do not overshadow the product.
- Create a scene: Set up a scene that tells a story or shows the product in use.
- Add depth and dimension: Use props to create layers and depth in your composition.
- Highlight features: Props can help draw attention to particular features of the product.
- Maintain balance: Ensure props are balanced and don’t clutter the image.
What props do you need to enhance your product?
- Lifestyle items: Items that reflect the lifestyle associated with the product.
- Color-coordinated props: Props that match or complement the product colors.
- Functional props: Items that show the product in use or its functionality.
- Thematic props: Objects that tie into a theme or season.
- Lighting accessories: Reflectors or diffusers to enhance the product’s appearance.
What props are used to show products?
- Backgrounds: Simple or textured backgrounds to make the product stand out.
- Stands and holders: To elevate the product and give it prominence.
- Decorative items: Vases, books, or small decorative objects to fill the scene.
- Hands or models: To show the product being used or worn.
- Mirrors and glass: For reflections and added interest.
It’s no secret that high-quality photos of your products can inspire and motivate your customers to take action.
One of the easiest ways to level up your brand aesthetic is by styling your product photos with eye-catching props. Props help bring your photos to life, giving interested online shoppers more reasons to click “add to cart.”
Ready to style your next product photo shoot like a pro? In this article, we’ll share our top tips on how to use props effectively and our favorite prop ideas for your next photoshoot.
Why props are important in product photography
People interact with thousands of photos and videos every day. If you want to grab people’s attention and get them to stop scrolling, you’ll need something to help you stand out. A professional, styled photo shoot can help you do just that.
A styled photo shoot is a photo shoot that combines visual elements with composition strategies to tell a captivating story about a product or brand. Photo styling helps convey emotion—inspiring viewers to feel what it’s like to be a part of your brand's story. It can also help highlight key features or functions of a product, so your customers understand how it works in real life.
Styling encompasses many different elements, including props, lighting, backdrop choice, and photo composition. With the help of photography pros, you can use photo styling to effortlessly communicate your brand values and attract the ideal customers to your business.
Six best props to use when styling product photos
From geometric risers to eye-catching backdrops, there are thousands of great prop ideas that can take your product photography to the next level. To help guide your search, we’ve put together a list of our go-to props for your next product photography shoot.
Styling blocks and risers
Geometric risers, or styling blocks, are some of the most popular and versatile props for product photographers. By adding different blocks and shapes to the shot, you can add dimension and visual interest to the photo.
Risers help with layering multiple products or items within an image. Transparent styling blocks are also great for elevating objects and creating sleek, beautiful flat-lay shots.
Fabrics and textiles
Fabrics are an elegant way to add texture and depth to your photos. Photographers frequently use textiles and fabrics to prop up beauty items, accessories, and home goods. We love using fabrics as props because they’re easy to find and effortlessly create an elegant, high-end look. If you’re looking for more variety, you can replace a static backdrop with a flowy, silky fabric.
We recommend using neutral-colored fabrics that align with your color scheme. That way, you can highlight your product and add depth to the photo without distracting the viewer's eye to a busy or bright fabric.
Mirrors
Mirrors are one of the best styling hacks out there. The reflection of a mirror creates a new, creative angle for any product type.
Mirrors are perfect for flat-lay cosmetics and beauty shots. They’re also great for displaying the different angles and dimensions of a jewelry item or accessory. Mirrors are portable, affordable, and statement-worthy—making them a must-have for your prop kit.
Trays
Similar to styling blocks, trays are an excellent prop to use if you want to add depth, layering, and visual interest to your photos. Trays are available in various sizes, shapes, colors, and materials. The most common application for trays is food and beverage photos, but we’ve also seen trays used effectively in skincare and beauty photos.
Natural accents
Botanic accents like flowers and greenery create a soft, fresh look in your photos. You can choose from a wide range of options in this prop category.
Use fresh flowers or a potted plant to infuse vibrance and life into your product photos. Add a few leaves or flower petals to your flat lay to create shadows and add dimension. With natural accents, the possibilities are endless.
AI props
You don’t need actual tangible props to add them to your shots. You can use AI to add whatever props you can think of. The benefit here is you have tons more flexibility, and you can switch out props without having to shoot photos all over again.
<div style="position: relative; padding-bottom: 44.375%; height: 0;"><iframe src="https://www.loom.com/embed/0348468a32584070b4699015889ba269?sid=9659b57b-0f06-412c-888b-bc2abbe9a0ce" frameborder="0" webkitallowfullscreen mozallowfullscreen allowfullscreen style="position: absolute; top: 0; left: 0; width: 100%; height: 100%;"></iframe></div>
Whether you're updating fresh uploads or building upon your existing shoots, AI props allow you to seamlessly infuse new life into your images. Enhanced photos are conveniently saved and displayed in your personal galleries.
Tips for styling your product photos with props
Photo props come in many different shapes and sizes. Before you select props for your next shoot, there are a few things you’ll want to consider:
Know your audience
Before you start buying props online, take a step back and examine your brand message and audience needs. Knowing the exact message your product shots are trying to convey will help guide your prop choices and styling decisions.
Start by looking at your brand guidelines. Is your style simple and clean? Or bold and colorful? What props complement your brand specifics, like your voice, style, and tone?
Next, think about your audience. Are you selling in a high-end market or budget-friendly space? Do you have a target audience in mind, such as a specific demographic or interest group? Understanding your audience and how your product photos can communicate your brand message will save you time and money when selecting props.
Understand your lighting needs
Lighting is one of the most important styling elements in photography. Lighting profoundly affects how the viewer perceives your product. Not only does lighting determine how bright or dark a photo appears, but it also enhances the emotions and finer details of a photo.
One of the most basic and affordable lighting options is natural light. Natural light is any light that comes from the sun or moon. Pros and amateurs alike use natural light throughout the day to capture various light qualities and intensities. For example, photos captured during the “golden hour” (right after sunrise or just before sunset) have a warm, glowing effect.
In contrast, artificial lighting is any light produced from an artificial source. You can create countless lighting scenarios at any hour of the day with artificial light. It is more predictable and manageable than natural light. Whether you’re going for a crisp, clean look or a dark, moody vibe, artificial light can do it all.
Talk to your photographer if you’re unsure about the best lighting for your photos. They’ll be able to give you expert advice and help you pick the perfect lighting to enhance your brand vibe.
Pick the right backdrop
The perfect backdrop can do wonders for setting the right tone and drawing attention to your product. When choosing a backdrop, follow a few simple guidelines.
- Choose a color scheme that complements your brand aesthetic
- Pick subtle, neutral colors that draw attention to the product
- Experiment with different textures like wood or metal
- When in doubt, use a neutral like cream, white, or dove gray
The right backdrop choice will not only enhance your brand look—it will also isolate and draw attention to the product and complementary props in the shot. As you build your shot list, try various backdrop colors and textures to see which one resonates most with your audience.
Think about photo composition
Once you’ve figured out the best lighting and backdrop choice for your photos, it’s time to pull everything together. Before you arrive at your shoot, think about how you want to arrange your props and products within each shot.
Photo composition refers to organizing items in a photo to draw attention to the main subject. When composing your product shots, you’ll want to ensure your product is front and center.
One way to achieve this is by using the rule of thirds. The rule of thirds is a photography guideline that places the subject in the left or right third of the image, leaving the other two-thirds open. You can use this technique to create more balanced shots and draw the viewer's eye to the main focal point of your photo - your stunning product.
As you start arranging your photo layouts, select props that enhance the overall composition of the shot. Stick to the rule of thirds, so you don’t overcrowd the shot or distract from the story you’re trying to tell.
Choose the right size and quantity
The size and quantity of props you use play a critical role in the impact your photos have on your audience. Too many props can overcrowd the shot and confuse viewers. Props that are too large can mislead people into thinking your product is smaller or larger than it appears.
In photography, scale is a technique used to measure the size of one object relative to another. This technique is often used in product photography to give viewers a better idea of the actual size of a product. When choosing your props, select small items that add dimension and visual context to the photo without dwarfing your product.
The quantity of props you choose is just as important as the size. Some products require several props, while others only need one. For example, if you’re shooting a beauty kit, you might use several geometric risers to layer the shot and add dimension. Whereas, if you’re shooting a food or beverage item, you may opt to use a single prop like a spoon or a cup to draw attention straight to the product.
Before you choose props, think about your shot list and calculate how many props you will need. If you decide to use more than one prop, make sure it blends cohesively with your color scheme and fits the overall theme of the shoot.
Keep your budget in mind
You don’t want to break the bank buying a whole set of props you may or may not use. Take a minute to jot down your dream prop list and put them in order of priority. That way, you can focus your budget on must-have props vs. your prop wish list.
When finding your props, the best place to start is right inside your home. Look around your space for everyday items you can efficiently use in your next shoot. You can also check out your local second-hand shops or vintage stores for unique styling items. If you are looking for something ultra-specific, search online and purchase your prop from a shop that specializes in photography props.
Create product content that converts with soona
Bold, eye-catching product photos are a must-have for your online store. That said, getting quality content at an affordable price is not always an easy task.
That’s why we’ve designed our virtual platform to make it easy for you to get the content you need on any budget. The soona platform makes exploring new looks and experimenting with different props simple and fun. You’ll find everything you need to get inspired, build your next shoot, and wow your audience with professional photos of your products.
{{studio-ad}}
Product photography props FAQs
What are props in product photography?
Props in product photography are objects or items used to add visual context and enhance the overall emotional effect of a photo.
What are some good photography props?
- Styling blocks and risers
- Fabrics and textiles
- Mirrors
- Trays
- Natural elements
- AI props
What are natural props for product photography?
- Plants and flowers
- Wooden items
- Fabrics like linen, cotton, or burlap
- Stones
- Shells
- Water
- Food
How to use props in a photo?
- Complement the product: Choose props that enhance and do not overshadow the product.
- Create a scene: Set up a scene that tells a story or shows the product in use.
- Add depth and dimension: Use props to create layers and depth in your composition.
- Highlight features: Props can help draw attention to particular features of the product.
- Maintain balance: Ensure props are balanced and don’t clutter the image.
What props do you need to enhance your product?
- Lifestyle items: Items that reflect the lifestyle associated with the product.
- Color-coordinated props: Props that match or complement the product colors.
- Functional props: Items that show the product in use or its functionality.
- Thematic props: Objects that tie into a theme or season.
- Lighting accessories: Reflectors or diffusers to enhance the product’s appearance.
What props are used to show products?
- Backgrounds: Simple or textured backgrounds to make the product stand out.
- Stands and holders: To elevate the product and give it prominence.
- Decorative items: Vases, books, or small decorative objects to fill the scene.
- Hands or models: To show the product being used or worn.
- Mirrors and glass: For reflections and added interest.