

We know that creative content is king, and the visual appeal of your product can make or break a sale. However, not everyone has the luxury of a professional photo studio or a bottomless budget for elaborate photoshoots.
Enter the realm of post-photo magic! Today, we're diving into the art of background removal, transforming mundane kitchen table setups into captivating product images. The best part? You don't need to be a photo editing master to achieve it.
Ready to turn your ordinary product photos into extraordinary sales magnets? Let's get started!
5 ways to remove your background
So, we’ve discussed who should remove the background from their image, why it needs to be done, and even common things to look out for that need removing. All that’s left to do now is run through the different ways that you can remove your background. It all comes down to two ways you can do it: either automatically, using an app or photo editing software, or manually. We’ve detailed each way, below.
With so many online retailers looking to make their images perfect, the demand for easy-to-use photo editing apps and software has never been higher. With so many of these apps able to remove your background with just a press of a button, it’s easy to see why they’re so widely used. Below, we’re highlighting just a few of the most popular software available. It also does well to understand the role AI has in creativity, ahead of using it for the first time.
1. soona Media Editor
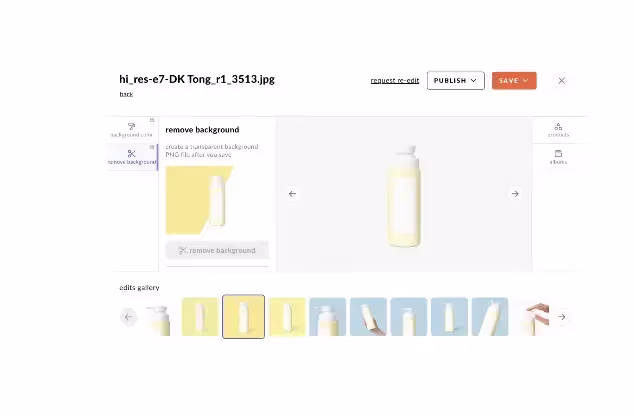
Free to use, soona created Media Editor—a whole new suite of creative tools to help your content go further. Customize your images by removing the background to fit whatever you sell, wherever you sell! By using soona’s Media Editor tool, featuring remove background capabilities, you can easily and seamlessly remove the background of a picture in three easy steps:
- Select your image from your soona gallery to get started.
- Click “remove background” and watch the tool effortlessly remove the background.
- Download and publish your high-resolution image to wherever you post and sell.
{{tools-ad="/external-components"}}
Canva
Canva is a popular design tool choice for a reason. Offering thousands of templates, graphics, and effects, you can create content for your store that has a professional feel, while remaining true and consistent to your brand.
Paid subscribers can use the one-click background remover feature by simply uploading an image, navigating to “effects” and choosing “background remover.” Wait a couple of seconds, and then voila! You’ve got an image with no background to play around with.
With so many design features, you can replace the background with whatever you want. Canva has a diverse product offering and can be used across all your content for promotion. soona even launched an app for Canva, a game-changing tool that seamlessly integrates your soona content with Canva’s powerful suite of tools and design templates.
Check out the soona Canva app >
Adobe Photoshop and Illustrator
For a non-designer, Adobe’s suite of products can seem overwhelming, especially if you’re just looking to quickly remove the background of your product photo. But if you have previous experience editing photos, or at least are up for the challenge, it can be a great option for creating that picture-perfect image.
With Photoshop, you can make your background transparent, remove objects, and even match the background to fill in gaps left behind by the unwanted objects that were removed. It’s even incorporated AI into its features, allowing you to AI-generative fill your background. In addition to this, you can play around with text, drawing, effects, and more to make your image pop. Illustrator is similar but is best used for vector-based designs.
Like Canva, if you’re new to the photo-editing world, this tool might be a bit too advanced straight out of the gate, as it has so many tools and features that the interface can be confusing to use. However, if you do know your way around it, you can create truly professional-looking images to display on your digital storefront.
Paintshop
Another popular tool, Paintshop is a tool geared toward beginners. Remove or change your background with this software’s free features and tools. The caveat is it can only be used in Windows, and sometimes takes a bit of time to process. Perfect for newbies to photo editing, you’ll be able to remove your background easily with Paintshop, at a low cost.
Manually
If you’re not sure about using a software or automation tool, or perhaps aren’t confident in your ability to navigate its interface, there’s no need to worry! There are also a few different ways you can manually remove the background from your product images, using your phone or computer.
By editing directly on your device, your image will be readily available to upload to your product listing page, without having to extract it from a software or app. If you’re looking to remove your background, doing it manually might just be the way for you!
iPhone
While a dedicated design tool is handy, you don’t need it to remove the background, when you already have an iPhone. One of the most widely used smartphones, the iPhone has an option to remove the background of your image, with no third-party app download required. If you want to remove your background without the frills, follow these steps on your device, and you’ll have an enhanced image ready to post, in no time.
- Open your files and find the photo you want to edit.
- Tap and hold the photo.
- Select “quick actions” when the menu appears.
- Tap “remove background”. The image is then saved to your files.
By following those four simple steps, you’ll be left with your image without its background, to save to your photos. It’s as simple as that!
Mac
Next on our list of ways that you can manually remove your background, is doing it on a Mac. Depending on how confident you are using a computer versus a smartphone, you might prefer to have your image edited and saved directly to your laptop so that you can then easily locate and upload the image to your product listing. Follow the below steps to remove the background image of a photo on your MacBook and save it locally.
- Right-click on the image that you want to edit.
- Hover over the “quick actions” option in the menu that appears.
- Click “remove background.” The image is then saved to your files.
It’s that simple! After completing those three steps, if you want to save the edited image to another location, you can easily locate it in your files, name it as you see fit, and save it to any folder on your laptop, ready to upload to your online store.
Windows
Like editing on a Mac, there’s also a way to remove the background of your photo on Windows. If you have a Microsoft device and want to edit your photo directly on your computer so the image can be saved in an easy-to-find location, then this is the way forward for you! Simply follow the steps below to edit your image on Windows and save it locally.
- Select the photo you want to edit.
- In the toolbar, select Picture Format > Remove Background, or Format > Remove Background.
- The default background will be colored magenta, signaling that this is the section marked for removal.
- You can edit this by selecting “Mark Areas to Keep” and marking the spots with the free-form drawing tool. Similarly, you can choose to remove even more with the “Mark Areas to Remove” selection, again using the free-form pen.
- When done, click Keep Changes.
It’s as easy as that. You can then choose to save it as a picture and file it away in the relevant folder. It’s important to note that vector graphic files, such as SVG, AI, WMF, and DRW, don’t have an option to remove the background. If you wish to edit a photo in this format, you must first convert it.
Why remove background from product photos?
There are a whole host of reasons you might wish to remove the background. Perhaps you’re going to post a product listing and notice an object in the background that you hadn’t before. Or maybe you did this intentionally, knowing that you were only going to post the product alone, against a transparent backdrop, and had planned to remove it.
It all really boils down to maximizing your investment in product content and repurposing those assets to market and promote your products across all channels and marketplaces—each with its own distinct specs and size requirements.
{{product-catalogue}}
There are also instances where you might be obliged to remove them, such as branding guidelines. For example, if your product is an I <3 NYC hoodie, and you took a picture of it in Times Square, you’ll likely have a very busy background that distracts from the focus of your image. In this case, you could either remove the background entirely or replace it with something that better suits your brand.
Every image must also be on-brand, and consistent with the imagery for your store. If you sell lip gloss and have all your products on a pink backdrop, you won’t want to upload a picture of you holding a product in your living room, as it would disrupt the branding. In this case, you could simply remove the background, and replace it with a color. What’s more, online marketplaces have rules and guidelines you need to follow to put up your product listing. In the case of Amazon, your product must be on a white background.
Whichever reason you have for removing your background, there is no need to worry, as we’ll teach you how to do it in simple steps, throughout this guide.
What to remove from your background
Now that you understand why things need to be removed, let’s have a look at a few common examples of objects that you should look out for in your product images. If you spot any of the below, it might be wise to whip out the background-removing software and extract that object from your picture. After all, why would you want the customer to focus on an unwanted object, when they could be drawn in by your product, instead?
People
Let’s go back to our Times Square example. If you took your product photo in a busy place, you’re bound to have people in the background. Of course, to remain compliant with privacy rules, you can’t post any images of people without their consent. So, in this case, you would need to either remove the people from the background one by one or remove the background entirely.
A word of advice? Shoot your product photos in a quiet space to avoid this headache!
Distracting elements
As we said earlier, you don’t want anything else to pull the eye away from what matters—your product. If you find any flashy, colorful, or otherwise distracting objects in your background, it might be best to remove them. At the very least, blur the background to minimize the distractions.
Unwanted objects
Finding unwanted objects in your background happens to the best of us. Imagine you’re selling jeans and take a photo of your product by holding it up in front of you, as you stand in your living room. Then, upon looking at the image further, you notice your clothes drying rack is accidentally featured in the background—with your unmentionables as the star of the show. Of course, this would be a case of removing those objects or simply replacing the background altogether.
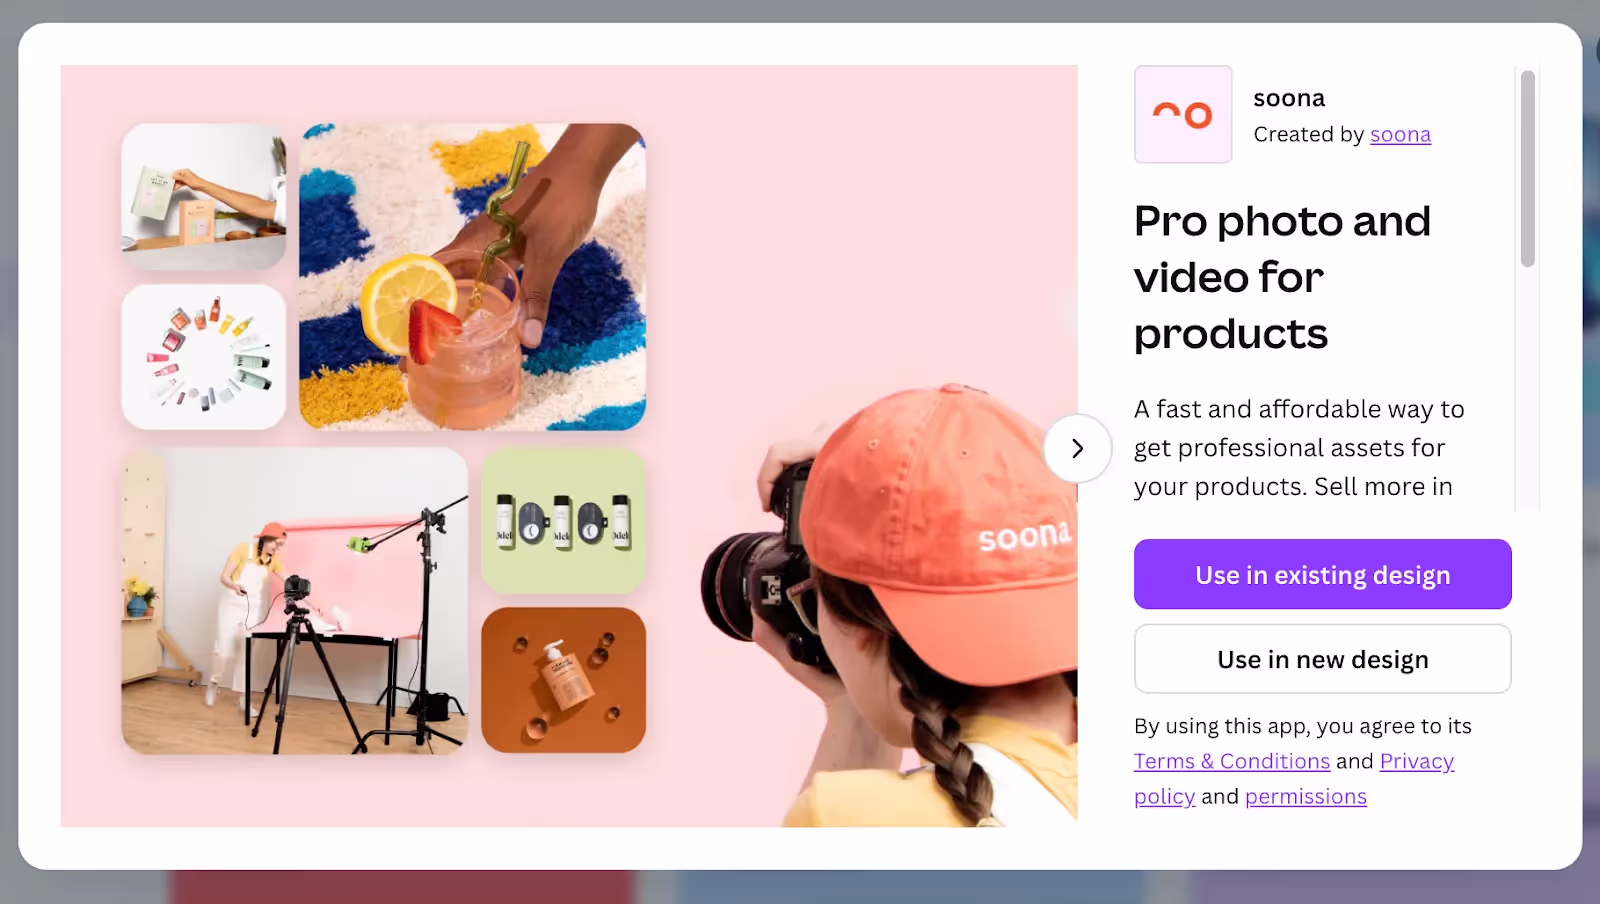
Get all the product photo edits you need with soona
So there you have it! A few options for removing your background images with ease. Now you don’t have to worry too much about the backdrop of your product photoshoot, ever again. Not only that, but once you remove your background, these tools can replace it with any color, design, texture, or graphic that you want, to make your product photos shine.
{{product-catalogue}}
We know that creative content is king, and the visual appeal of your product can make or break a sale. However, not everyone has the luxury of a professional photo studio or a bottomless budget for elaborate photoshoots.
Enter the realm of post-photo magic! Today, we're diving into the art of background removal, transforming mundane kitchen table setups into captivating product images. The best part? You don't need to be a photo editing master to achieve it.
Ready to turn your ordinary product photos into extraordinary sales magnets? Let's get started!
5 ways to remove your background
So, we’ve discussed who should remove the background from their image, why it needs to be done, and even common things to look out for that need removing. All that’s left to do now is run through the different ways that you can remove your background. It all comes down to two ways you can do it: either automatically, using an app or photo editing software, or manually. We’ve detailed each way, below.
With so many online retailers looking to make their images perfect, the demand for easy-to-use photo editing apps and software has never been higher. With so many of these apps able to remove your background with just a press of a button, it’s easy to see why they’re so widely used. Below, we’re highlighting just a few of the most popular software available. It also does well to understand the role AI has in creativity, ahead of using it for the first time.
1. soona Media Editor
Free to use, soona created Media Editor—a whole new suite of creative tools to help your content go further. Customize your images by removing the background to fit whatever you sell, wherever you sell! By using soona’s Media Editor tool, featuring remove background capabilities, you can easily and seamlessly remove the background of a picture in three easy steps:
- Select your image from your soona gallery to get started.
- Click “remove background” and watch the tool effortlessly remove the background.
- Download and publish your high-resolution image to wherever you post and sell.
{{tools-ad="/external-components"}}
Canva
Canva is a popular design tool choice for a reason. Offering thousands of templates, graphics, and effects, you can create content for your store that has a professional feel, while remaining true and consistent to your brand.
Paid subscribers can use the one-click background remover feature by simply uploading an image, navigating to “effects” and choosing “background remover.” Wait a couple of seconds, and then voila! You’ve got an image with no background to play around with.
With so many design features, you can replace the background with whatever you want. Canva has a diverse product offering and can be used across all your content for promotion. soona even launched an app for Canva, a game-changing tool that seamlessly integrates your soona content with Canva’s powerful suite of tools and design templates.
Check out the soona Canva app >
Adobe Photoshop and Illustrator
For a non-designer, Adobe’s suite of products can seem overwhelming, especially if you’re just looking to quickly remove the background of your product photo. But if you have previous experience editing photos, or at least are up for the challenge, it can be a great option for creating that picture-perfect image.
With Photoshop, you can make your background transparent, remove objects, and even match the background to fill in gaps left behind by the unwanted objects that were removed. It’s even incorporated AI into its features, allowing you to AI-generative fill your background. In addition to this, you can play around with text, drawing, effects, and more to make your image pop. Illustrator is similar but is best used for vector-based designs.
Like Canva, if you’re new to the photo-editing world, this tool might be a bit too advanced straight out of the gate, as it has so many tools and features that the interface can be confusing to use. However, if you do know your way around it, you can create truly professional-looking images to display on your digital storefront.
Paintshop
Another popular tool, Paintshop is a tool geared toward beginners. Remove or change your background with this software’s free features and tools. The caveat is it can only be used in Windows, and sometimes takes a bit of time to process. Perfect for newbies to photo editing, you’ll be able to remove your background easily with Paintshop, at a low cost.
Manually
If you’re not sure about using a software or automation tool, or perhaps aren’t confident in your ability to navigate its interface, there’s no need to worry! There are also a few different ways you can manually remove the background from your product images, using your phone or computer.
By editing directly on your device, your image will be readily available to upload to your product listing page, without having to extract it from a software or app. If you’re looking to remove your background, doing it manually might just be the way for you!
iPhone
While a dedicated design tool is handy, you don’t need it to remove the background, when you already have an iPhone. One of the most widely used smartphones, the iPhone has an option to remove the background of your image, with no third-party app download required. If you want to remove your background without the frills, follow these steps on your device, and you’ll have an enhanced image ready to post, in no time.
- Open your files and find the photo you want to edit.
- Tap and hold the photo.
- Select “quick actions” when the menu appears.
- Tap “remove background”. The image is then saved to your files.
By following those four simple steps, you’ll be left with your image without its background, to save to your photos. It’s as simple as that!
Mac
Next on our list of ways that you can manually remove your background, is doing it on a Mac. Depending on how confident you are using a computer versus a smartphone, you might prefer to have your image edited and saved directly to your laptop so that you can then easily locate and upload the image to your product listing. Follow the below steps to remove the background image of a photo on your MacBook and save it locally.
- Right-click on the image that you want to edit.
- Hover over the “quick actions” option in the menu that appears.
- Click “remove background.” The image is then saved to your files.
It’s that simple! After completing those three steps, if you want to save the edited image to another location, you can easily locate it in your files, name it as you see fit, and save it to any folder on your laptop, ready to upload to your online store.
Windows
Like editing on a Mac, there’s also a way to remove the background of your photo on Windows. If you have a Microsoft device and want to edit your photo directly on your computer so the image can be saved in an easy-to-find location, then this is the way forward for you! Simply follow the steps below to edit your image on Windows and save it locally.
- Select the photo you want to edit.
- In the toolbar, select Picture Format > Remove Background, or Format > Remove Background.
- The default background will be colored magenta, signaling that this is the section marked for removal.
- You can edit this by selecting “Mark Areas to Keep” and marking the spots with the free-form drawing tool. Similarly, you can choose to remove even more with the “Mark Areas to Remove” selection, again using the free-form pen.
- When done, click Keep Changes.
It’s as easy as that. You can then choose to save it as a picture and file it away in the relevant folder. It’s important to note that vector graphic files, such as SVG, AI, WMF, and DRW, don’t have an option to remove the background. If you wish to edit a photo in this format, you must first convert it.
Why remove background from product photos?
There are a whole host of reasons you might wish to remove the background. Perhaps you’re going to post a product listing and notice an object in the background that you hadn’t before. Or maybe you did this intentionally, knowing that you were only going to post the product alone, against a transparent backdrop, and had planned to remove it.
It all really boils down to maximizing your investment in product content and repurposing those assets to market and promote your products across all channels and marketplaces—each with its own distinct specs and size requirements.
{{product-catalogue}}
There are also instances where you might be obliged to remove them, such as branding guidelines. For example, if your product is an I <3 NYC hoodie, and you took a picture of it in Times Square, you’ll likely have a very busy background that distracts from the focus of your image. In this case, you could either remove the background entirely or replace it with something that better suits your brand.
Every image must also be on-brand, and consistent with the imagery for your store. If you sell lip gloss and have all your products on a pink backdrop, you won’t want to upload a picture of you holding a product in your living room, as it would disrupt the branding. In this case, you could simply remove the background, and replace it with a color. What’s more, online marketplaces have rules and guidelines you need to follow to put up your product listing. In the case of Amazon, your product must be on a white background.
Whichever reason you have for removing your background, there is no need to worry, as we’ll teach you how to do it in simple steps, throughout this guide.
What to remove from your background
Now that you understand why things need to be removed, let’s have a look at a few common examples of objects that you should look out for in your product images. If you spot any of the below, it might be wise to whip out the background-removing software and extract that object from your picture. After all, why would you want the customer to focus on an unwanted object, when they could be drawn in by your product, instead?
People
Let’s go back to our Times Square example. If you took your product photo in a busy place, you’re bound to have people in the background. Of course, to remain compliant with privacy rules, you can’t post any images of people without their consent. So, in this case, you would need to either remove the people from the background one by one or remove the background entirely.
A word of advice? Shoot your product photos in a quiet space to avoid this headache!
Distracting elements
As we said earlier, you don’t want anything else to pull the eye away from what matters—your product. If you find any flashy, colorful, or otherwise distracting objects in your background, it might be best to remove them. At the very least, blur the background to minimize the distractions.
Unwanted objects
Finding unwanted objects in your background happens to the best of us. Imagine you’re selling jeans and take a photo of your product by holding it up in front of you, as you stand in your living room. Then, upon looking at the image further, you notice your clothes drying rack is accidentally featured in the background—with your unmentionables as the star of the show. Of course, this would be a case of removing those objects or simply replacing the background altogether.
Get all the product photo edits you need with soona
So there you have it! A few options for removing your background images with ease. Now you don’t have to worry too much about the backdrop of your product photoshoot, ever again. Not only that, but once you remove your background, these tools can replace it with any color, design, texture, or graphic that you want, to make your product photos shine.
{{product-catalogue}}